This work instruction is part of the guide Setting up your insurance solution.
In this step, it is assessed whether the requested risk is acceptable and whether the insurance can be issued under the specified terms. Acceptance is therefore an essential part of the insurance process. This section explains how the acceptance process works.
Acceptance templates
Before you start configuring an acceptance template, it is important to have the acceptance requirements available. This includes, among other things:
- Product guide
- Acceptance criteria
Acceptance templates are linked to the sales item. You do this by clicking “Meer” in your sales item and pinning the acceptance templates in the “Realisatie” category or by making the panel visible.
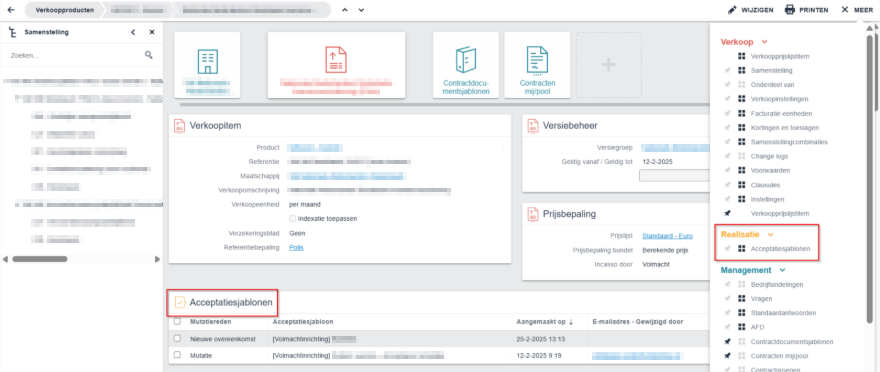
In the Acceptance Templates panel, you can add existing acceptance templates to the sales item. When you click the plus icon, the following fields need to be completed:
- Verkoopitem: The relevant sales item (automatically filled in by default).
- Mutatiereden: Select the reason for change to which the acceptance template applies. Is the acceptance template applicable for a new policy or a booking without change?
- Acceptatiesjabloon: Select an existing acceptance template here.
- Acceptatievragensjabloon: Select the template with acceptance questions for this sales item.
- Slotvragensjabloon: Select the template with final questions for this sales item.
- Voortgangsconfiguratie: Select the preferred progress display.

Help: For a better understanding of the operation and content of acceptance templates, please refer to the related community article: Acceptance templates in Novulo
Accept policy
The acceptance of the policy is determined based on the acceptance template linked to the corresponding sales item.
After creating a policy, you will see a button labeled “Acceptatie uitvoeren” in the top right corner. Clicking this button starts the acceptance process.
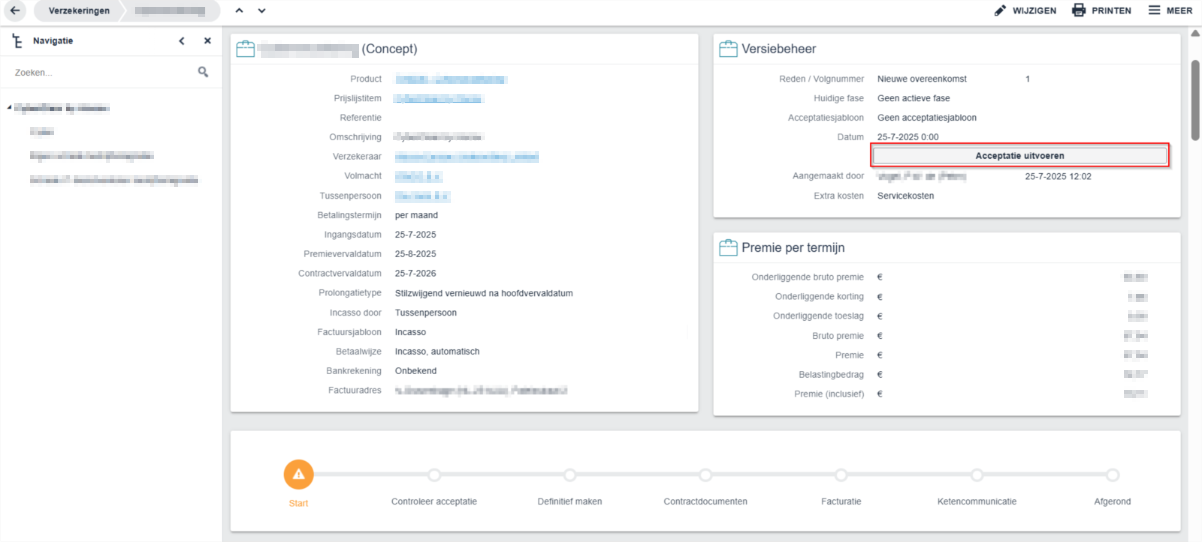
Acceptance Result
When you click “Acceptatie uitvoeren”, there are six possible outcomes:
1. Acceptance Approved
If the insurance meets all the conditions in the acceptance template, the acceptance is approved.
In the “Geaccepteerd door” field, you will see the email address of the employee who approved the acceptance, along with a timestamp of the approval.

2. Review Required
When this result occurs, you will receive a notification that you can click to view more details about the result. Here you can see why it was rejected and any related comments. You can perform the acceptance again, approve it after review, or reject it after review.
Before approving or rejecting the acceptance, you must provide a reason. The same employee is not allowed to perform the acceptance again; another employee must do this.

3. Acceptance Rejected
If the insurance does not meet all the conditions in the acceptance template, the acceptance is rejected.

Sometimes, an acceptance must be manually reviewed after the result is “Beoordeling nodig”. In these cases, one of the following results will occur:
4. Approved After Manual Review
The acceptance is manually approved after review. Rules:
- A reason for approval must be provided.
- The “Accepted by” field shows who approved it and when.
- The original reviewer may not perform this action; another employee must complete it.
5. Rejected After Manual Review
The acceptance is manually rejected after review.Rules:
- A reason for rejection is mandatory.
- The system records who performed the rejection and when.
- The employee who performed the earlier review may not complete this action.
6. Random Failure
Random failure refers to a situation where the acceptance procedure unexpectedly stops or fails without a clear or predefined reason.