This work instruction is part of the guide Setting up your insurance solution.
Prepare
Perform a careful analysis of the product to be configured. Our workshop and backlog templates can help request all necessary information in a structured way for efficient configuration. Download Workshop & Backlog Templates (Dutch)
An SUIV Product (Standard Underwriting Insurance Variation) is a pre-configured product with standardized settings that can be quickly deployed. In this instruction, we will create an SUIV product in our application. See the Work instruction - Custom product if you deviate from the SUIV standard.
To be able to implement a SUIV product our application needs to have a Solera Certificate to be able to communicate with the VPI calculation box. This needs to be configured once.
To create a product we will need a GIM register and AFD Definitions.
Solera Certificate
Check if your Solera certificate is configured correctly follow the following path:
Settings - General Settings - Click the only row - Click on “More” and select Solera Connections.
Here you can see if your certificate is configured:
GIM Register
Companies publish a GIM Registration Message which is collected by SIVI (Dutch). Using a GIM Registration Message, these products can be made available in your system house application.
Make sure you have your GIM Registration collected through SIVI or your system house.
-
Navigate to All apps - Settings in Novulo.
-
On the left panel, search for “GIM” and click on GIM Registers.
-
Click on “Add new register(s)” and select the register you want to import, this should be a *.GIM file.

-
After uploading your GIM register we can select and open it.
Under Objects, select the desired GIM message.
-
Check the desired product(s), terms and conditions to import and click Generate GIM Transformation.
Import AFD Definition
AFD definitions can be downloaded from the SIVI website and uploaded manually.
When you have your AFD *.zip file we can upload it into our application.
-
Navigate to Settings > AFD Definitions.
-
Click on the “+” in the upper right corner to upload a new definition.
-
Fill in as much information as you can under “AFD definition” on the left side.
Select your *.zip file on the right side to upload it and click “Save” in to top right corner.
Now you can click “Unzip main AFD definition file”.
-
After unzipping the file the block “AFD definition files” will be shown. Select the row ending with “*kunnenAanleveren.zip” and click on “Import”.
-
The block “AFD definition elements” will now be filled, you have to refresh the page to see this progression. All the elements have to be checked if they are mapped on properties of the correct products and/or coverages. This is the column “OK?”.
-
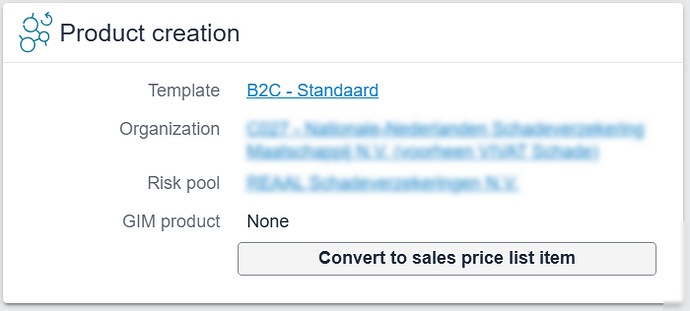
When all elements are mapped correctly we can fill in the following fields in the block “Product creation”.
- “Template”: “B2C - Standaard“ (automatically filled in)
- ”Organization”: Relevant organisation
- ”Risk Pool”: Depending on your organisation there could be several options.
- “GIM product” can be left empty.
Now we can click on “Convert to sales price list item”
-
A screen pops up asking if we want to use an existing product, select the relevant product.
-
Congratulations! In this new screen, you can see your new Product Sales Item. Since we uploaded an AFD definition all acceptance criteria, elements, and composition combinations should be correct. This product is now available in your application.


